


Introduction
Redux Toolkit is a react package for state management built on redux. In this tutorial, I’ll explain how to use the Redux toolkit by building a small to do list app that keeps its state using Redux Toolkit. I personally prefer redux toolkit over regular redux because it is much easier to use. The creators of the package intended to make it the default way to write Redux logic. They eliminated a bunch of boilerplate code and made redux state management easier to create.
The UI
I won’t be focusing on the UI in this tutorial, so I made this github repository that you can clone that has the UI already created for you. (link)
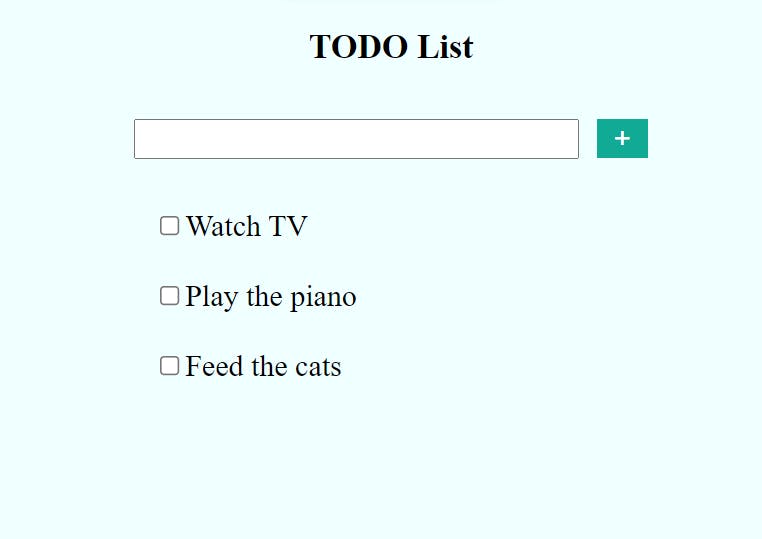
Now we have the UI that looks like this:
Using Redux Toolkit
Now that we have our UI ready, you’ll see that I’ve hard-coded the to-do list items. Our goal in this part of the article is to make the user able to add and remove to-dos from the list.
Installing Redux Toolkit
After cloning the repository above and installing packages, you should install redux toolkit and react-redux using the following command:
npm install @reduxjs/toolkit react-redux
Creating the Todo Slice
The slice is the component that keeps track of the app’s state. In it, You should define the initial state and the functions that will be needed to change the state when necessary.
To build the slice, you need to import
createSlice. Which is a function inside the Redux Toolkit package.import { createSlice } from "@reduxjs/toolkit";Next, define your initial state. In this case, two variables will be part of the state:
count: an integer that keeps track of the number of to-dos in the app (initially equals 0)todos: a list that contains all the todos that the user added (initially empty)const initialState = { count: 0, todos: [], };
Now, use the
createSlicefunction that was imported. It takes three arguments:- Name of the slice (in this case
todo) - Initial state (defined above)
reducers (the functions that will be used to change the state values)
export const todoSlice = createSlice({ name: "todo", initialState, reducers: { addTodo: (state, action) => { const todo = { id: Math.random() * 100, text: action.payload, }; state.todos.push(todo); state.count += 1; }, removeTodo: (state, action) => { state.todos = state.todos.filter((todo) => todo.id !== action.payload); state.count -= 1; }, }, });Here, two functions were added, one is
addTodoand the other isremoveTodo:addTodo→ creates a new todo item using the text passed in the argument and assigns a random id to it. It pushes the created todo to the todos list and increases the count value.removeTodo→ removes the todo item using the id given in the arguments from the todos list and decrements the count value.Note that to get the argument passed to the function, we use
action.payload. If you need more than one argument, you can send the arguments as one object and access it using the payload. For example:action.payload.variable
- Name of the slice (in this case
Export the functions to be able to use them in the app. You can do so by accessing
todoSlice.actions.export const { addTodo, removeTodo } = todoSlice.actions;Finally, export the reducer. This will be used in the store to be able to provide the state to the app (see next section)
export default todoSlice.reducer;
Full TodoSlice code
import { createSlice } from "@reduxjs/toolkit";
const initialState = {
count: 0,
todos: [],
};
export const todoSlice = createSlice({
name: "todo",
initialState,
reducers: {
  addTodo: (state, action) => {
    const todo = {
      id: Math.random() * 100,
      text: action.payload,
    };
    state.todos.push(todo);
    state.count += 1;
  },
  removeTodo: (state, action) => {
    state.todos = state.todos.filter((todo) => todo.id !== action.payload);
    state.count -= 1;
  },
},
});
export const { addTodo, removeTodo } = todoSlice.actions;
export default todoSlice.reducer;
Creating the store
The store is the component that you provide to the redux provider that makes it aware of the existence of the state.
Create a folder in your src folder called “store” and create an index.js file inside
Add the following code to the file. This will make the store listen to our reducer and that’s how we’ll be able to access the variables and the functions inside our slice. We’ll name our reducer “todo”
 import { configureStore } from "@reduxjs/toolkit";
 import todoReducer from "../features/todoSlice";

 const store = configureStore({
   reducer: {
     todo: todoReducer,
   },
 });

 export default store;
Adding the store to our app.
To provide the store to the app, use the normal redux provider.
In your index.js file add the following code:
import React from "react";
import ReactDOM from "react-dom";
import App from "./App";
import "./index.css";
import store from "./store";
import { Provider } from "react-redux";

ReactDOM.render(
  <Provider store={store}>
    <React.StrictMode>
      <App />
    </React.StrictMode>
  </Provider>,
  document.getElementById("root")
);
Using the State
To use the state that was just created in the app, import useSelector and useDispatch from redux. Also, import addTodo and removeTodo from the slice file.
Add the following imports to your App.js file:
 import { useSelector, useDispatch } from "react-redux";
 import { addTodo, removeTodo } from "./features/todoSlice";
In the App function, get both the count and todo states using
useSelector. Note that to access any of those states, you should access the reducer name that was specified in the store file like this:const count = useSelector((state) => state.todo.count); const todos = useSelector((state) => state.todo.todos);Extract the
dispatchfunction that will be used to runaddTodoandremoveTodofunctions.const dispatch = useDispatch();Write
handleAddTodofunction that will be triggered when the form is submitted.const handleAddTodo = (e) => { e.preventDefault(); dispatch(addTodo(input)); };Calling
e.preventDefault()is necessary because the form’s default action is to refresh the page after submitting. If you let it refresh the page, all our state will be reset.For the
handleTodoDonefunction, it will be triggered it when the user clicks on a todo item. The id of the todo will be used to identify which todo is removed.const handleTodoDone = (id) => { dispatch(removeTodo(id)); };In the form element, add an
onSubmitaction that points tohandleAddTodo<form className="App-form" onSubmit={handleAddTodo}>To show the list of to-dos, map the
todoslist to theTodoItemcomponent and pass the id to the key and id attributes. In addition, pass the text of the todo and thehandleTodoDonefunction.If the count is equal to 0, “No todos” will be displayed to the user.
 <div className="Todos">
         {count > 0 &&
           todos.map((todo) => (
             <TodoItem
               key={todo.id}
               text={todo.text}
               id={todo.id}
               onCheck={handleTodoDone}
             />
           ))}
         {count === 0 && <p>No todos</p>}
 </div>
In the TodoItem file, add a function that listens to clicking on the item
.Full TodoItem.js file:
 import "./TodoItem.css";

 const TodoItem = (props) => {
   const deleteTodo = () => {
     props.onCheck(props.id);
   };
   return (
     <div className="todo" onClick={deleteTodo}>
       <input type="checkbox"></input>
       <label>{props.text}</label>
     </div>
   );
 };

 export default TodoItem;
Your app.js file should look like this now:
 import { useState } from "react";

 import "./App.css";

 import TodoItem from "./components/TodoItem";
 import { useSelector, useDispatch } from "react-redux";
 import { addTodo, removeTodo } from "./features/todoSlice";

 function App() {
   const [input, setInput] = useState("");

   const count = useSelector((state) => state.todo.count);
   const todos = useSelector((state) => state.todo.todos);
   const dispatch = useDispatch();

   const handleAddTodo = (e) => {
     e.preventDefault();
     dispatch(addTodo(input));
   };

   const handleTodoDone = (id) => {
     dispatch(removeTodo(id));
   };
   return (
     <div className="App">
       <h1>TODO List</h1>
       <form className="App-form" onSubmit={handleAddTodo}>
         <input type="text" onInput={(e) => setInput(e.target.value)} />
         <button type="submit">+</button>
       </form>
       <div className="Todos">
         {count > 0 &&
           todos.map((todo) => (
             <TodoItem
               key={todo.id}
               text={todo.text}
               id={todo.id}
               onCheck={handleTodoDone}
             />
           ))}
         {count === 0 && <p>No todos</p>}
       </div>
     </div>
   );
 }

 export default App;
Final Output

Conclusion
That’s it for the redux toolkit tutorial, you can find the full code here. I personally prefer redux toolkit over regular redux because it lessens the boiler plate code a lot. No one likes to write the same code over and over again right? I hope you enjoyed this tutorial, your feedback is more than welcome! In the next tutorial, I’ll be connecting this to-do list app to firebase so stay tuned!